Let’s Taco ‘Bout It! – Review of Joyride Taco House Restaurant

Joyride Taco House

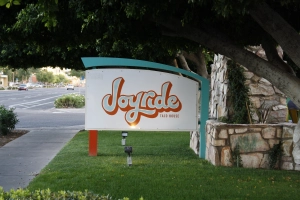
Let’s taco ’bout something – my favorite restaurant of the summer, Joyride Taco House! It really does live up to its name.  Eating there makes me happy!  I love everything about it, the tacos, the salsa, the atmosphere, the decor, and the beautiful patio.

Joyride Taco House

This restaurant is one of several restaurants created by the same owners whose philosophy includes taking old buildings in urban areas and turning them into restaurants.  Each is unique in style and full of character as well as good food.  I reviewed another one of their restaurants, Postinos, last year.  Joyride used to be an old Italian restaurant named Aiello’s and long before that was Humpty Dumpty’s Coffee Shop.  It has been updated with a coral, turquoise, and yellow color palate which contributes to its joyful atmosphere.  The decor has a modern, urban feel to it.

Joyride Taco House

One of my favorite elements is the extremely long, bright turquoise booth where there is plenty of seating to people watch and visit if you have to wait for a table.

Joyride Taco House

If you love to sit outside like I do, Joyride has a great patio which is shaded by umbrellas during the day and the building itself blocks the sun in the late afternoon and evenings.

Joyride Taco House

There is also a mist system that allows you to stay on the patio despite the summer heat! Yay!!

Joyride Taco House

A couple of my favorite things about the patio besides the misters, are the large trees and little white lights,

Joyride Taco House

and the fireplace.

Joyride Taco House

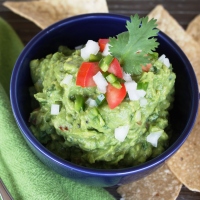
Now, let’s taco ’bout the food!  Chips and salsa are a very important part of Mexican food in Arizona, and the house salsa is incredible (see my recipe for Chipotle Salsa for something similar).  You also have a choice of 4 other salsas if you choose.

Joyride Taco House

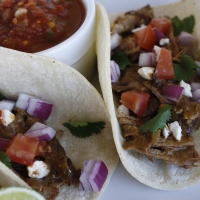
There are 11 tacos on the menu, and it is my goal to happily work my way through all of them this summer (so many tacos, so little time)!  They have several different fish tacos, a couple of types of chicken ones, a veggie choice, and several beef tacos.  All of them have interesting sauces and condiments on them with names I can’t always pronounce and often times have no idea what they are, but I haven’t found one I don’t like yet.  I have tried the grilled fish taco,

Joyride Taco House

breaded fish taco,

Joyride Taco House

chicken tinga taco,

Joyride Taco House

the standard chicken taco,

Joyride Taco House

and one of the beef tacos so far.  All of them were unique and delicious!  It’s hard to pick a favorite.  Tortilla soup is another option which is so flavorful and full of all kinds of yummy ingredients.  (You can see in the background we inhaled the salsa and pretty much licked the bowl clean.)

Joyride Taco House

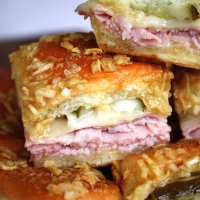
If tacos and tortilla soup are not your cup of tea or should I say, your bowl of salsa, a variety of burritos, tortas, enchiladas, and tamales are on the menu.  There are also some great sides –  fresh salads (one of the dressing options is prickly pear vinaigrette which was wonderful),

Joyride Taco House

and Mexican Street Corn,

Joyride Taco House

just to name a couple we enjoyed.  The servers have all been very attentive and friendly as well, and we have had a great time every time we’ve eaten at Joyride.

Jeff Kelley, Vicki and Don Poor

Joyride Taco House

After looking through all these pictures, it sure makes me want to go back again.  By the way, what are you doing for lunch?:)

Joyride Taco House

Joyride Taco House

5202 N. Central Avenue

Phoenix, AZ   85012

602-274-8226

or

302 N. Gilbert Road

Gilbert, AZ   85233

480-632-8226

Hours:

M-Th 11-11

F,S 11-12

Sun. 11-10

Menu:  Joyridetacohouse.com


Joyride Taco House


Posted in Restaurant Reviews, Things to Do in Arizona | Tagged , , , , , , , , , | 13 Comments

Chocolate Dipped Vanilla Ice Cream Bars

Chocolate Dipped Vanilla Ice Cream Bars

I have had so much fun experimenting with popsicles lately.  With temperatures rising this week to 115, the thought of turning on my oven to bake, was not appealing.  Popsicles were all I could think about.  I recently ate a coconut popsicle at my parents’ house, and it was so good, I set out to recreate it at home.  Jeff does not do coconut, though, so I made him some vanilla ice cream bars instead.  I am so glad I did, because those were the ones I ended up liking the best.

Chocolate Dipped Vanilla Ice Cream Bars

Have you ever eaten a chocolate dipped ice cream bar from Costco? I love them and have a hard time resisting buying one whenever I shop there. Happily, that is exactly what these bars tasted like – creamy vanilla ice cream inside, dipped in rich homemade hard shell chocolate outside, and topped with chopped roasted almonds or not depending on what you prefer.

Chocolate Dipped Vanilla Ice Cream Bars

The chocolate these are dipped in is actually homemade Magic Shell which is basically chocolate that hardens when it comes into contact with something cold like ice cream.  Jeff loves Magic Shell on his ice cream so I’ve been meaning to try making my own for a long time.  Turns out it only contains 2 ingredients, chocolate chips and coconut oil and is super quick to make.  I don’t think I will ever buy it again. If you buy good quality chocolate chips, the taste is very rich and chocolaty, and is the best thing about these ice cream bars.

Chocolate Dipped Vanilla Ice Cream Bars

They are pretty easy to make as long as you follow the directions exactly.  I had to make them a couple of times before I was able to get the magic shell to stick.  I realized it was because I hadn’t waited long enough for the chocolate to cool off and the popsicles were too melty after removing them from the popsicle molds.  The trick was to place the popsicles back in the freezer overnight so that they were extremely cold when I dipped them, and to make sure the chocolate had cooled for at least an hour.  Using a plate that had been in the freezer to place them on after dipping really helped too. When I tried it again using those techniques, it worked perfectly.  If you are a fan of ice cream bars or Magic Shell, I hope you will give these a try.  They are a real treat on a hot summer day, and are going to be on my summer bucket list from now on!

Chocolate Dipped Vanilla Ice Cream Bars

Copycat Magic Shell recipe from Gimme Some Oven

Chocolate Dipped Vanilla Ice Cream Bars

  • Servings: 6-8
  • Difficulty: easy
  • Print

For the Vanilla Ice Cream (read through the recipe first as there are several steps involved that include freezing overnight):

  • 1 1/2 c heavy cream
  • 1/2 c half and half
  • 1/4 c sugar
  • 1 tsp. vanilla
  1. Stir together all ingredients until blended.
  2. Pour into popsicle molds.
  3. Insert sticks.
  4. Freeze overnight.  (Also freeze a couple of plates or cookie sheet to use when you are dipping popsicles in chocolate).
  5. To unmold popsicles, run warm water over the bottom of the mold for about 10-15 seconds.  Take out popsicles and place in a plastic baggy not touching each other, seal it, and freeze overnight or at least until the popsicles are completely frozen again.

For the Chocolate Magic Shell:

  • 1 c good quality semi-sweet chocolate chips
  • 2 T coconut oil (not hard-pressed for less coconut taste)
  1. Place chocolate chips and coconut oil in a microwavable dish.
  2. Heat in microwave for 30 seconds.  Stir.
  3. Place back in microwave and heat at 10 second intervals, stirring after each time until chocolate is melted (keep in mind if any water touches chocolate it will freeze up).
  4. After chocolate is melted, set aside to cool for 1 hour before using.
  5. Can be kept at room temperature for up to 1 month.  If it hardens, melt again in microwave at 10 second intervals, and cool for 1 hour before using.

To Dip Popsicles:

  1. When popsicles have been unmolded and refrozen and Chocolate Magic Shell has been made and cooled at least an hour, take out frozen plate or cookie sheet and line with parchment paper.
  2. Pour chocolate into a narrow mug or pitcher tall enough and wide enough for a popsicle to fit in it.
  3. Take out 1 popsicle at a time from freezer, dip in the chocolate, and quickly sprinkle with chopped almonds if desired.  Place on frozen plate and place in freezer, while getting out next popsicle to dip.  Repeat process until all popsicles are dipped, placing each one on frozen plate or cookie sheet in freezer after dipping.
  4. When all are dipped, and the chocolate is hardened, place popsicles in a baggy and seal.  Freeze for at least a couple of hours before serving.
  5. When ready to serve, take out of freezer, and eat immediately.

Recipe from Cook AZ I Do


Posted in Company, Desserts, Ice Cream Recipes, Recipes, Summer Recipes | Tagged , , , , , , , , | 48 Comments

Homemade Vanilla Almond Granola

Vanilla Almond Granola

Recently a friend of ours gave us a quart of honey that he got from his first attempt at raising honey bees.  It is thick and sweet and delicious, and we were excited that he gave us some.  A quart of honey is a lot, though, so I started pondering what I could use it for.  My first thought was granola as learning how to make my own granola has been a goal of mine for a long time.  In a lot of granola recipes, honey is used as the sweetener so this was perfect.

Arizona Honey

Granola is really easy to make.  If I had known that, I would have made it a long time ago.  Basically, for this recipe, you mix the whole oats and sliced almonds together.  Then you heat up the honey and oil until the honey melts, add in the vanilla, pour it over the oat mixture and stir.   After that you spread the mixture out on parchment paper on a cookie sheet, and bake it.  In minutes you have a wholesome, delicious, and quick breakfast or snack with no additives or preservatives.  It also travels well so would be perfect to take on vacation or camping.

Vanilla Almond Granola

I doubled the vanilla in this recipe so it has a lot of vanilla flavor.  My daughter thought I was making cookies when she smelled it in the oven.  This granola is a great combination of crunchy and sticky which makes for a lot of those yummy clumps of grains which are so satisfying.

Vanilla Almond Granola

I have tried a couple different recipes, and this one is my favorite so far.  The fun thing about granola is that it is so customizable to what your family likes.  Once you have the basic recipe down, you can add in whatever extras you enjoy.  Mostly I like it just plain, but a lot of my family likes Craisins, so for this batch, I added those.  (I just pick out the Craisins, and then there is a bigger Craisin to granola ratio for everyone else – I am very selfish thoughtful that way).  You could add dried blueberries, or cherries, or mini-chocolate chips just to name a few.  If I used chocolate chips, I wouldn’t be picking those out, though.  In fact, I think the chocolate chip to granola ratio would go down considerably if I got a hold of it first.  I cannot be trusted around chocolate or ice cream or sweets of any kind.  It is one of my worst traits.  By the way, have you heard of the New Lucky Charms cereal box that has all marshmallows?  Can you still call it cereal if all there is are marshmallows? And, do you think it would be wrong if I added Lucky Charms marshmallows to my granola?  All I know is, I want a box of that “cereal”.

Vanilla Almond Granola

I can’t believe I am talking about Lucky Charms in my healthy granola post.  But that is so me in a nutshell.  Mostly eating healthy, but my desire for sweet treats getting in the way at times.  My favorite way to eat granola is on top of yogurt or  just grab a handful for a quick breakfast when I am in a hurry in the morning.  I am thinking it is better for you than a bowl full of marshmallows.  Good thing I haven’t figured out where to get that cereal yet!:)

Vanilla Almond Granola

  • Servings: 4 cups
  • Difficulty: easy
  • Print

  • 2 c rolled oats (not the quick oats)
  • 1 c sliced almonds
  • 1/4 c canola oil
  • 1/4 c honey
  • 1 1/2 tsp. vanilla extract
  • dash of salt
  • add-ins such as Craisins, chocolate chips, dried blueberries, etc. (optional)
  1. Preheat oven to 350 degrees.
  2. Line an 11×15 jelly roll pan or cookie sheet with parchment paper.
  3. In a large bowl, stir together oats and almonds.
  4. In a medium saucepan add oil, honey, and a dash of salt.  Heat on medium low until honey is melted, and little bubbles are around the edges, stirring constantly.  When melted and bubbling around edges, take pan off of the heat and stir in vanilla.
  5. Pour liquid mixture over oat mixture and stir until well coated.
  6. Spread evenly onto parchment lined pan.
  7. Bake for 10 minutes, and stir.  Then bake another 5 minutes or until granola is lightly browned.  Watch carefully as it browns quickly.
  8. Let cool until crisp.
  9. Stir in your add-ins (optional).
  10. Store in a sealed container at room temperature.

Recipe from Cook AZ I Do


Posted in Breakfast, Cabin Recipes, Company, Recipes | Tagged , , , , , , , | 21 Comments

Salmon Patties

Salmon Patties

I am always looking for new ways to fix salmon.  Most of the time Jeff eats whatever I fix without complaining, but anytime dinner involves fish, I can just tell he isn’t too excited about it.  We both want to be healthy, though, so I continue to look for better ways to incorporate fish into our diet that makes it more palatable for us.  Jeff had asked me to try making salmon patties as he remembered liking them as a kid.  These salmon patties were perfect for both of us.  They were so flavorful, moist, and didn’t taste fishy at all.  And, it was a great summer meal because you saute the patties in a skillet and don’t have to use your oven.

One of the things I like most about this dish is that it is also full of vegetables.  It gives the patties great texture and flavor not to mention even more healthy ingredients for your body.  They are sauteed in oil, but using olive oil made me feel a little better about that.  So overall, I made these in order to make us more healthy, but I would make them again, just because we both liked them so much.  That makes for a doubly great recipe, and one that I know I will be making over and over again.

Salmon Patties

There is quite a bit of chopping involved and a cooling period for the patties before frying them so just make sure you start early enough.  You could even chop the vegetables and bake the salmon earlier in the day, and finish the dish right before dinner.  I tried making up the patties the day before, and then sauteing them the next day, and they came out great.  However you do it, I highly recommend this recipe for getting omega-3’s into your diet and keeping your family happy!

Salmon Patties

Salmon Patties

  • Servings: 10
  • Difficulty: easy
  • Print

  • 1/2 lb. fresh salmon
  • olive oil
  • salt and pepper
  • 4 Tbsp. unsalted butter
  • 3/4 c small-diced red onion
  • 1 1/2 c small-diced celery
  • 1/2 c small-diced red bell pepper
  • 1/2 c small-diced yellow bell pepper
  • 1/4 c minced fresh flat-leaf parsley
  • 1 Tbsp. capers, drained
  • 1/4 tsp. hot sauce (recommended:  Tabasco)
  • 1/2 tsp. Worcestershire sauce
  • 1 1/2 tsp. crab boil seasoning (recommended:  Old Bay)
  • 3 slices stale bread, crusts removed or 1 c seasoned bread crumbs
  • 1/2 c good mayonnaise
  • 2 tsp. Dijon mustard
  • 2 extra-large eggs, lightly beaten
  1. Preheat oven to 350 degrees.
  2. Place the salmon on a sheet pan, skin side down.  Brush with olive oil and sprinkle with salt and pepper.  Roast for 15 to 20 minutes, until just cooked.  Remove from the oven and cover tightly with aluminum foil.  Allow to rest for 10 minutes and refrigerate until cold.
  3. Meanwhile, place 2 Tbsp. of the butter, 2 Tbsp. olive oil, the onion, celery, red and yellow bell peppers, capers, hot sauce, Worcestershire sauce, crab boil seasoning, 1/2 tsp. salt, and 1/2 tsp. pepper in a large saute pan over medium-low heat.  Cook until vegetables are soft, approximately 15 to 20 minutes.  Turn off heat.   Add parsley and stir into the vegetables.  Cool to room temperature.
  4. Break the bread slices in pieces and process the bread in a food processor fitted with a steel blade or measure out store-bought bread crumbs.
  5. You should end up with 1 c bread crumbs either way.  Place the bread crumbs on a sheet pan and toast in the oven for a few minutes until lightly browned, tossing occasionally.  Watch carefully as they burn quickly.
  6. Flake the chilled salmon into a large bowl.  Add the toasted bread crumbs, mayonnaise, mustard, and eggs.
  7. Add the vegetable mixture and mix well.
  8. Cover and chill in the refrigerator for 30 minutes.  Shape into 10 (2 1/2 to 3 ounce patties) approximately 3/4 inches thick.
  9. Heat 2 Tbsp. butter and 2 Tbsp. olive oil on medium low heat.  In batches, add salmon patties, and fry 2 1/2 to 4 minutes per side until browned.  Drain on paper towels, and keep warm in 250 degree oven until ready to serve.  Refrigerate any leftovers.

Recipe slightly adapted by Cook AZ I Do, originally from Ina Garten at Food Network.com


Posted in Fish Recipes, Main Dish, Recipes, Summer Recipes, Weeknight Meals | Tagged , , , , , | 21 Comments

Old Fashioned Baked Beans for the Holidays

Old Fashioned Baked Beans

When I started to have Easter at my house every year, I wanted to serve baked beans with the traditional ham.  I set out on a mission to find baked beans like I remembered from my childhood.  Beans that are flavored with bacon, thick with brown sugar that has caramelized from long, slow baking, and that have that perfect balance between the sweetness of the sugar and the tanginess of the ketchup and mustard. It took several batches of beans, and a few disappointing recipes until I settled on this one.  It is a little bit sweet, and gooey, and bacony, and thick, and I just love it!  The canned beans just don’t compare to making your own baked beans at home.

It is super simple, too.  The hardest part is frying up the bacon, and chopping the onion, but once that is done, you just throw everything together. Having a good baked beans recipe really comes in handy.  There are so many holidays where they make the perfect side dish, just like the 4th of July coming up. And they are a great accompaniment any time you want to bar-b-q.  You can also make them earlier in the day if you want, and keep them in the refrigerator until time to bake them.

Old Fashioned Baked Beans

The Fourth of July is one of my favorite holidays.  I think because even though we live in a big city, on that day, everyone comes out of their houses, finds the nearest fireworks, and sets up their lawn chairs next to each other.  Strangers talk to each other while their children run around and play on the grass nearby.  It feels like we live in a small town just for a little while.  And, even though there will always be disagreements over how our government should do things, during the fireworks, everyone is smiling and happy and seems  focused on being thankful for the freedoms and blessings they enjoy, proud of their country that has provided them,  just for a few minutes.  Seems like a pretty great holiday if it can accomplish all that in such a short amount of time.

Old Fashioned Baked Beans

Old Fashioned Baked Beans

  • Servings: 10
  • Print

Old Fashioned Baked Beans

  • 3 lbs. canned pork and beans (drain most of the juice)
  • 3 Tbsp. prepared mustard
  • 3/4 c ketchup
  • 1 c brown sugar, packed
  • 1/4 c molasses
  • 5 ounces cooked, crumbled bacon (plus more for garnish)
  • 2 tsp. liquid smoke
  • 3 Tbsp. onion, diced
  1. Preheat oven to 325 degrees.
  2. Coat inside of a casserole dish with non-stick cooking spray.
  3. In a large bowl, place pork and beans (drained), chopped onion, and cooked, crumbled bacon.  Stir gently to combine.
  4. In a separate, medium-size bowl, stir together, mustard, ketchup, brown sugar, molasses, and liquid smoke.
  5. Pour ketchup mixture into bean mixture and stir gently to combine.
  6. Pour bean mixture into prepared casserole dish.
  7. Cover with foil, and bake 1 hour 30 minutes.
  8. Serve immediately.  Refrigerate any leftovers.

Recipe from https://cookazido.wordpress.com


Posted in 4th of July Recipes, Easter, Father's Day Recipes, Memorial Day Recipes, Recipes, Side Dishes, Summer Recipes | Tagged , , , , , , | 20 Comments

Rocky Road Fudge Brownies

Rocky Road Fudge Brownies

I’ve made these 3 times in the last 2 weeks.  I’ve eaten them 3 times in the last 2 weeks.  I am on a diet.  I found out something very important.  Brownies are not good for a diet.  Just thought I’d share that piece of information in case you were wondering.  If you are on a diet, by all means, do not make these brownies.  They are TOO hard to resist.  They are moist, melty, gooey, chocolaty, and overall wonderful.  One of my favorite brownie recipes ever!

It is weird that I like these brownies.  I really don’t understand it.  You know how everyone likes smores everything right now?  I didn’t jump on that bandwagon because I don’t care for marshmallows.  And these have a layer of marshmallows underneath the chocolate fudge frosting.  But I love them!  Don’t ask me to explain myself.  I don’t understand me either.  All I can think of is that I probably would like anything with chocolate fudge frosting on top of it.  It is the same with my daughter.  She doesn’t like marshmallows either and she likes these brownies.  I guess the apple doesn’t fall far from the tree, or the marshmallow doesn’t fall far from the bag or something like that.

Rocky Road Fudge Brownies

All of this is to say, if you do like marshmallows, and you do like fudge frosting, think how much you will like these brownies!  And if you are like my daughter and me, you will still like these brownies.  The marshmallows get sprinkled over the brownies while they are still warm, and the frosting gets poured over the marshmallows while the frosting is warm, and what you end up with is a wonderful creamy substance that just melts in your mouth, that ruins your diet, and makes you very happy.  Rocky Road Fudge Brownies would be great to take to a 4th of July celebration, camping, or on vacation this summer.  And we all know that calories don’t count when you’re on vacation.  Perfect time to make these!

Rocky Road Fudge Brownies

  • Servings: 15-20
  • Difficulty: easy
  • Print

  • 1 (9×13 size) brownie mix (I used Duncan Hines Dark Chocolate Fudge) or your favorite brownie recipe
  • ingredients to make brownie mix (eggs, oil, water)
  • 3 c chopped pecans (optional)
  • 3 c miniature marshmallows
  • 2 (1 ounce) squares unsweetened chocolate
  • 1/3 c milk
  • 1/2 c butter (1 stick)
  • 1 box (16 oz.) powdered sugar
  • 1/2 tsp. vanilla
  1. Preheat oven to 350 degrees.
  2. Prepare brownie mix according to package directions.  Stir in pecans if using.
  3. Spoon batter into a greased 13x9x2-inch baking pan.
  4. Bake for 18 to 21 minutes, depending on the mix you use.  Make sure to check it after 18 minutes with a toothpick, and don’t over-bake.
  5. Remove from oven, and sprinkle miniature marshmallows over hot brownies.  Set aside.
  6. While brownies are cooling, start making frosting by combining chocolate, milk, and butter in a heavy saucepan. Cook over low heat until chocolate and butter melt, stirring often.  Remove from heat.
  7. Pour powdered sugar into a mixing bowl.  Add vanilla and melted chocolate mixture.  Beat at low-speed until smooth.
  8. Spread over brownies, being careful not to dislodge marshmallows.
  9. Cool in pan on a wire rack.
  10. When cool, cover, and put in refrigerator until ready to serve.
  11. Cut brownies in squares.  Store any leftovers covered in the refrigerator.

Recipe from Cookazido


Posted in 4th of July Recipes, Bars, Cabin Recipes, Company, Desserts, Party Recipes, Recipes, Summer Recipes | Tagged , , , , , | 27 Comments

Cinnamon Walnut Zucchini Bread or Baseball?

Cinnamon Walnut Zucchini Bread

We have been having so much fun lately picking vegetables from our garden.  There are certain recipes I only make during this time.  I love cooking seasonally.  It makes you appreciate what you are eating, and we look forward to this time all year. A lot of the dishes I make contain ripe tomatoes just harvested that morning or fresh, almost sweet red potatoes roasted with garlic and rosemary that have also just recently been picked.  One of the other vegetables I have been using a lot lately is zucchini in every form – from appetizers to main dishes and everything in between.  But one of our favorite ways to eat it is in Cinnamon Walnut Zucchini Bread.

I have been making loaves and loaves of this lately.  What I like about it is that it is full of cinnamon and nuts and is very moist. You don’t taste the zucchini.  It just helps keep it moist, kind of like carrot cake.  It can be easily frozen and brought out when you have company or need a quick breakfast.  It is also a very simple recipe where you pretty much just throw everything together in a bowl, mix it up, and throw it in the oven.

For someone who often times gets busy, waits too long in between picking vegetables from the garden, and whose zucchini is the size of a small baseball bat, zucchini bread is a great remedy! Not that I would ever do that.  Actually we grow multi-purpose zucchini.  You can either play baseball with it or eat it, or if you prefer, play baseball with the zucchini, and then make bread with the pieces afterwards.  Either way works!:) One of our zucchinis got so big while we were out-of-town, I put it on a scale to see how much it weighed.  It rang in at a healthy 4 1/2 pounds!  So you can see why I’ve been making a lot of zucchini bread lately.  It’s a good thing I found a great recipe.  But garden or no garden, this bread is delicious and totally worth buying zucchini at the store if you have to.  Not quite as much fun as playing veggie baseball, but delicious, none the less!

Cinnamon Walnut Zucchini Bread

  • Difficulty: easy
  • Print

  • 3 eggs
  • 2 c sugar
  • 1 c oil
  • 2 c all-purpose flour
  • 2 Tbsp. cinnamon (this is not a typo – it really is 2 Tablespoons)
  • 1/4 tsp. baking powder
  • 2 tsp. baking soda
  • 1 tsp. salt
  • 2 tsp. vanilla
  • 2 c grated zucchini
  • 1 c chopped walnuts
  1. Preheat oven to 350 degrees.
  2. Spray a loaf pan with cooking spray.
  3. Grate zucchini with a cheese grater, and set aside.
  4. In a mixing bowl, beat eggs, sugar, oil, and vanilla until just blended.
  5. In a separate medium size bowl, whisk flour, cinnamon, baking powder, baking soda, and salt.
  6. Pour dry ingredients, zucchini, and nuts into sugar/egg/oil mixture and mix on low-speed until just blended.  Don’t over-mix.
  7. Pour into loaf pan filling 3/4 of the way full.
  8. Bake for approximately 50 minutes, depending on the size of your loaf pan.  Don’t over-bake.  In fact, take it out when a toothpick inserted into the middle comes out a tiny bit moist, just about 2 minutes from being completely cooked through.  Otherwise, the bread will be too dry.
  9. I usually have a little batter left and fill a few cupcake papers in a cupcake pan with the leftover batter for zucchini muffins.  Those I fill 3/4 full, and bake for approximately 18 minutes.
  10. Let cool and serve.
  11. Freeze or refrigerate any leftovers.


Posted in Breads and Rolls, Breakfast, Food Gifts, Recipes, Summer Recipes, Zucchini Recipes | Tagged , , , , , | 20 Comments

My Favorite Marinade for Grilled Chicken

Teriyaki Chicken Kebabs

I have been wanting to post this recipe for a long time as it is probably the one I’ve used the most over the last 29 years.  It is an amazing teriyaki marinade that, when marinated overnight, gives grilled chicken an incredible flavor.  I received this recipe when I got married from my cousin Toni who lived in Hawaii at the time.  I will be forever grateful she gave it to me.

I have a couple of theories about what makes a good marinade.  I don’t know if I’m right, but I have a sneaking suspicion that I am.  I prefer not to have oil in a marinade because while you are cooking it drips into the coals and causes the fire to flare up, therefore burning the meat.  I also think honey tends to cause the meat to burn more quickly.  That one I’m not positive on, but have found it to be true time and time again.  (It is either the honey and the oil or I am not a very good griller which is a great possibility.)   Anyway, that is one reason this is the perfect marinade to me.  It has sugar instead of honey, and it doesn’t contain any oil either.  So it is less fattening, and doesn’t get burned as easily.  What more could you want?  How about amazing teriyaki flavor?  It has that, too!  The secret is to marinate it overnight.  The hard part is remembering to marinate it overnight!  But if you can remember, it will be totally worth it, and dinner will be half done when you wake up in the morning.

This grilled teriyaki chicken would be a great thing to fix for dad for Father’s Day. You can either make it into kebabs or just grill whole pieces of chicken.   Don’t you just think bar-b-qing and Father’s Day go together?  My husband told me he heard on TV that dad’s just want to be left alone that day.  I thought that was kind of sad.  I’m hoping it means they just don’t want anything expected of them, and they just want to do whatever they enjoy.  I do understand that.  But they still need to eat.  So while they are doing whatever it is they enjoy doing, you can put this grilled chicken next to them.  I think they just might stop what they are doing and take a bite.  Just don’t ask them to help you with the dishes afterwards.  I think that might be pushing it a little!:)

Don Poor

Happy Father’s Day to my dad who has always been such a loving and supportive father and grandfather.  Thank you for always being there for me!

Teriyaki Marinade

  • 1/2 c sugar
  • 1 c soy sauce
  • 1 c water
  • 1/2 c cooking sherry or 1/4 c vinegar
  • 2 cloves minced garlic
  • 1 tsp. fresh ginger or 1/4 tsp. powdered ginger
  • chicken pieces (approximately 4)
  1. Pour all ingredients into a medium bowl and stir until mixed.
  2. Place 4 chicken breasts in bowl of marinade, cover, and refrigerate overnight or cut chicken into 1 1/2 inch cubes, and place in marinade to refrigerate overnight if making kebabs.
  3. When ready to eat, grill until cooked through, approximately 20 minutes depending on how hot your grill is and how big the chicken pieces are.  Discard marinade.
  4. If making kebabs, string chicken on skewers that have been soaked in water for 30 minutes, alternating with thick cut vegetables.  Discard marinade.
  5. Grill until done, watching carefully, and turning every 5 minutes for approximately 20 minutes.  Time will vary depending on size of chunks of chicken and what vegetables are used.


Posted in 4th of July Recipes, Chicken Recipes, Company, Father's Day Recipes, Low Fat, Main Dish, Recipes, Summer Recipes | Tagged , , , , , | 15 Comments

Creamy Vanilla Cheesecake with Fresh Raspberry Sauce

Vanilla Cheesecake with Raspberry Sauce

This is a guest post of sorts.  I am writing the post, but my sister did the baking.  We went to Santa Barbara, CA for my nephew’s high school graduation this last weekend.  Afterwards, there was a party to celebrate this special occasion.  It included a variety of desserts, but one of them especially called my name – homemade cheesecake!  It looked so creamy and had a lovely sour cream layer on top.  I took one bite, and then sighed.  It was heavenly!  I had been looking for a good cheesecake recipe for a long time.  Really, it was one of the best pieces of cheesecake I have ever had.

So I decided it was imperative that I share the recipe with you and record it for me so that I can make it every week – just kidding.  Maybe.  I definitely want to eat it every week.  In fact, as I write, I am going into cheesecake withdrawal.  Because, thankfully, there was cheesecake left over from the party.  And I had to be sure it was really good if I was going to write a post about it.  So I sacrificed my waistline all in the name of good blogging all weekend.  It had nothing to do with the fact that it is one of the best things I’ve ever eaten, and it kept calling me from the refrigerator.  It really was one of the noisiest cheesecakes I’ve ever come across!

I asked my sister if there was anything special we needed to know in order for it to turn out.  She said all she did was follow the directions on the recipe and that it was not that hard.  I have always been a little nervous about making cheesecakes from scratch.  They seem kind of tricky.  But according to her, it isn’t as hard as you would think.  And the results are reminiscent of something from The Cheesecake Factory. With Father’s Day coming up, this would make a perfect dessert for dad.  It will tell your dad just how much you love him.  I told you it was a noisy cheesecake!

Lori, Bryce, and Jeff Ridenour

Special thanks to my sister, Lori Ridenour, who is an amazing sister and cook, for this delicious cheesecake recipe! It originally came from a cookbook called Steamboat Entertains that she purchased in Steamboat Springs, Colorado.  And congratulations, Bryce!

Creamy Vanilla Cheesecake with Fresh Raspberry Sauce

For the Crust:

  • 2 c graham cracker crumbs (she used Honey Grahams)
  • 2 Tbsp. powdered sugar
  • 2 Tbsp. butter, melted
  1. Preheat oven to 325 degrees.
  2. Blend all crust ingredients.
  3. Pat into bottom and up sides of 10 inch springform pan.
  4. Bake approximately 6 minutes until firm.

For the Filling:

  • 1 1/2 lbs. cream cheese or 3 (8 oz. pkgs.), softened
  • 1 c granulated sugar
  • 1 Tbsp. vanilla extract
  • 3 eggs
  1. With mixer, blend cream cheese, sugar, and vanilla.
  2. Add eggs, one at a time, and mix thoroughly after each addition.
  3. Pour mixture into pan and bake at 325 degrees approximately 45 minutes or until center is firm.  Turn off oven and open door.  Let cake sit for 15 minutes in oven.  Remove from oven, and turn oven to 375 degrees.

For the Topping:

  • 16 oz. sour cream
  • 2 Tbsp. granulated sugar
  • 1 tsp. vanilla extract
  1. Mix all topping ingredients and spread evenly on top of filling.
  2. Place in oven for 5 to 6 minutes, just until top is set.  Remove from oven and chill thoroughly before removing from pan.
  3. If desired, drizzle raspberry sauce over each piece of cheesecake before serving, and top with fresh raspberries.  Refrigerate any leftovers.

For the Sauce:

  • 2 bags frozen raspberries
  • 1/4 c granulated sugar
  • 1 tsp. lemon juice
  • fresh raspberries for garnish, optional
  1. Blend frozen raspberries, sugar, and lemon juice in a blender until smooth.  Pour over individual slices of cheesecake, and top with fresh raspberries, if desired.  Refrigerate any leftover sauce.


Posted in Christmas, Company, Desserts, Father's Day Recipes, Mother's Day, Party Recipes, Recipes, Valentine's Day | Tagged , , , , , | 20 Comments

Cool Off This Summer with a Strawberry Lemonade Slushy

Strawberry Lemonade Slushy

I don’t know if it is the fact that I never grew up or that the summers are so hot here in Arizona, but I absolutely love frozen drinks.   I used to make them for the kids when they were younger, just to help them stay cool during the extreme heat.  It was also a good way to get another serving of fruit into their diet at the same time.  Whatever the reason, slushy drinks are just plain fun to drink, and they really do cool you off!

Strawberry Lemonade Slushy

This frozen drink is more on the tart side due to the lemonade, but you can adjust the tartness by adding more sugar if you like it sweeter.  I also like the addition of the banana and orange extracts as it adds a whole other level of flavor.  It is such an easy recipe.  You just throw everything into a blender and mix away.  It makes quite a bit, so would be good to serve as a special drink for company.  The straws add to the fun as well.  For a while it was hard to find them locally, but I was so happy to find them at Target this week in the kids’ party section.

Strawberry Lemonade Slushy

It was 110 degrees here today, so was the perfect day to make these.  I have a feeling I will be making them a lot this summer in order to stay cool.  If you need something to cool you off, try a strawberry lemonade slushy.  Your inner child (and your friends and family) will thank you!

Strawberry Lemonade Slushy

  • 1 quart strawberries, washed and green stems removed
  • 1 (6 oz.) can frozen lemonade concentrate
  • 2 tsp. banana extract
  • 1/2 tsp. orange extract
  • 4 c ice cubes
  • 1/4 to 1/2 c sugar
  1. Place strawberries, lemonade concentrate, both extracts, and ice cubes in a blender.  Blend until smooth.
  2. Pour into glasses and serve immediately.

Recipe from a McCormick/Schilling recipe card given out at the grocery store.


Posted in 4th of July Recipes, Company, Drinks, Recipes, Summer Recipes | Tagged , , , , , , , | 34 Comments